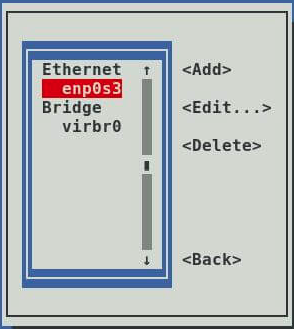
Showing posts with label Linux. Show all posts

Linux Hardware Command

Linux Hardware Command

Command Name

Command

Function

uname

$ uname -a

The uname command displays basic information about your system, includeing the operating system name, kernel version, and processor architecture.


lsblk

$ lsblk


The lsblk command lists all the available block devices on your system, including hard drives, SSDs, and USB drives. This will display a list of all the available block devices on your system.


lspci

$ lspci


The lspci command displays information about all the PCI buses and devices connected to your system. This command can be helpful if you need to determine which devices are installed on your system.


lsusb

$ lsusb


The lsusb command displays information about all the USB buses and devices connected to your system. This command can be helpful if you need to determine which USB devices are installed on your system.


Df

$ df -h


The df command displays information about the disk space usage on your system. This command can be helpful if you need to determine how much free space is available on your hard drive.


Free


$ free -h


The free command displays information about the system's memory usage. This command can be helpful if you need to determine how much free memory is available on your system.


Top

$ top


The top command displays information about the system's processes, including their CPU and memory usage. This command can be helpful if you need to determine which processes are using the most resources on your system.


Htop

$ htop


The htop command is similar to the top command, but it provides a more user-friendly interface with colored output and the ability to sort processes by various criteria.


Dmesg

$ dmesg


This will display the system's boot messages, including any errors or warnings that occurred during the boot process.


lsmod


$ lsmod


This will display a list of all the kernel modules currently loaded on your system.


lshw

$ sudo lshw


This will display detailed information about the hardware on your system.


Hwinfo


$ sudo hwinfo


The hwinfo command is similar to the lshw command, but it provides even more detailed information about the hardware on your system.

lsdev

$ lsdev


The lsdev command displays information about all the devices on your system, including disks, tapes, CD-ROMs, printers, and serial ports.


Ifconfig


$ ifconfig


The ifconfig command displays information about your network interfaces, including their IP addresses, netmasks, and MAC addresses. This command can be helpful if you need to troubleshoot network issues or simply to learn more about your network configuration.


Iwconfig

$ iwconfig


The iwconfig command displays information about your wireless network interfaces, including their SSIDs, signal strengths, and encryption settings. This command can be helpful if you need to troubleshoot wireless network issues or simply to learn more about your wireless network configuration. To use the iwconfig command, simply open a terminal window and type −


Uptime

$ uptime


The uptime command displays information about how long your system has been running, along with its average load. This command can be helpful if you need to determine how long your system has been running or to troubleshoot performance issues.

lsmod


$ lsmod


The lsmod command displays information about the kernel modules currently loaded on your system. This command can be helpful if you need to determine which modules are loaded or to troubleshoot issues related to kernel modules.

lspcmcia

$ lspcmcia


The lspcmcia command displays information about all the PCMCIA devices connected to your system. This command can be helpful if you need to determine which PCMCIA devices are installed on your system. To use the lspcmcia command, simply open a terminal window and type −


dmidecode

$ sudo dmidecode --type 17


This will display a list of all the PCMCIA devices connected to your system.


Install TomCat in Linuxmint

Apache Tomcat (called "Tomcat" for short) is a free and open-source implementation of the Jakarta Servlet, Jakarta Expression Language, and WebSocket technologies.[2] It provides a "pure Java" HTTP web server environment in which Java code can also run. Thus it is a Java web application server, although not a full JEE application server.

Tomcat is developed and maintained by an open community of developers under the auspices of the Apache Software Foundation, released under the Apache License 2.0 license. 


To install Apache Tomcat on Linux Mint, you can follow these steps:

  1. Open a Terminal: You can open the Terminal in Linux Mint by pressing Ctrl+Alt+T or by searching for it in the application menu.

  2. Update the Package List: It's always a good practice to update the package list to ensure you're installing the latest available version. Run the following command:

    bash
    sudo apt update
  3. Install OpenJDK: Apache Tomcat requires Java to run. You can install OpenJDK, which is an open-source implementation of Java, using the following command:

    bash
    sudo apt install default-jdk
  4. Download Apache Tomcat:

    • Visit the Apache Tomcat download page at https://tomcat.apache.org/download-90.cgi (replace "90" with the version you want to download).
    • Under "Binary Distributions," download the latest version of "Core" for your preferred format (usually a .tar.gz file).
  5. Extract Tomcat: Navigate to the directory where you downloaded the Tomcat archive file (e.g., ~/Downloads) and use the following command to extract it:

    bash
    tar -zxvf apache-tomcat-9.x.x.tar.gz

    Replace apache-tomcat-9.x.x.tar.gz with the actual file name you downloaded.

  6. Move Tomcat to a Preferred Location: You can move the extracted Tomcat directory to a location of your choice. For example, you can move it to /opt:

    bash
    sudo mv apache-tomcat-9.x.x /opt/tomcat
  7. Create a Symbolic Link: To easily manage Tomcat, create a symbolic link to the Tomcat directory. This step is optional but can be convenient:

    bash
    sudo ln -s /opt/tomcat /usr/local/tomcat
  8. Configure Environment Variables: To ensure that Tomcat can find the Java installation, you need to set the JAVA_HOME environment variable. Edit the catalina.sh script to set this variable:

    bash
    sudo nano /opt/tomcat/bin/catalina.sh

    Add the following line near the top of the file, just after #!/bin/sh:

    bash
    export JAVA_HOME=/usr/lib/jvm/default-java

    Save the file and exit the text editor.

  9. Start Tomcat: You can now start Apache Tomcat using the following command:

    bash
    /opt/tomcat/bin/startup.sh
  10. Access the Tomcat Manager: Open a web browser and go to http://localhost:8080 to access the Tomcat Manager. You should see the Tomcat homepage.

That's it! You've successfully installed Apache Tomcat on your Linux Mint system. You can now deploy web applications to Tomcat and manage it using the Tomcat Manager web interface.


If Apache Tomcat is prompting for a username and password when you try to access the Tomcat Manager, you need to configure user authentication. By default, Tomcat requires authentication to access the Manager application for security reasons. To configure user authentication, follow these steps:

  1. Create a User: Open a terminal and navigate to the tomcat directory:

    bash
    cd /opt/tomcat

    Then, open the conf/tomcat-users.xml file for editing:

    bash
    sudo nano conf/tomcat-users.xml

    Add a user with the necessary roles (e.g., manager-gui, admin-gui) to this file. Below is an example of a user with both roles:

    xml
    <tomcat-users> <user username="admin" password="your_password" roles="manager-gui,admin-gui"/> </tomcat-users>

    Replace "admin" with your desired username and "your_password" with your desired password.

    Save the file and exit the text editor.

  2. Restart Tomcat: After adding the user, you need to restart Tomcat for the changes to take effect:

    bash
    /opt/tomcat/bin/shutdown.sh /opt/tomcat/bin/startup.sh
  3. Access the Manager Again: Open a web browser and go to http://localhost:8080 or http://localhost:8080/manager (for the Manager app specifically). When prompted for a username and password, enter the credentials you configured in the tomcat-users.xml file.

You should now be able to access the Tomcat Manager using the provided username and password.

Remember to choose a strong password and keep your credentials secure, as they control access to the Tomcat Manager, which can perform administrative tasks on your Tomcat server.